چگونگی مانیتورینگ ترافیک شبکه در زمان کوتاه بر روی CentOS 6
چگونگی مانیتورینگ ترافیک شبکه در زمان کوتاه بر روی CentOS 6
در این آموزش شما یاد خواهید گرفت که چگونه در زمان کوتاه آمد و شد ترافیک را با استفاده از nload مشاهده کنید
این نرم افزار زمانی به کار شما می آید که بخواهید بدانید که سرورتان در ماه چه مقدار از پهنای باند استفاده خواهد کرد
این آموزش برای 32 و 64 CentOS 6 بیت کارایی دارد.
نصب nload:
You only need to install the nload package, which is in the EPEL repository. If you don’t have the EPEL repository setup, you can learn how to configure it in this tutorial.
yum -y install nload
Using nload
To run nload, enter the following command (respectively to your Ethernet adapter’s name). If you’re on another type of virtualization (e.g. KVM or Xen), the ethernet adapter’s name can vary from eth0 to even just eth.
nload venet0
nload allows you to define the unit used for network traffic:
nload venet0 -u b|k|g
- b = bytes
- k = kilobytes
- g = gigabytes
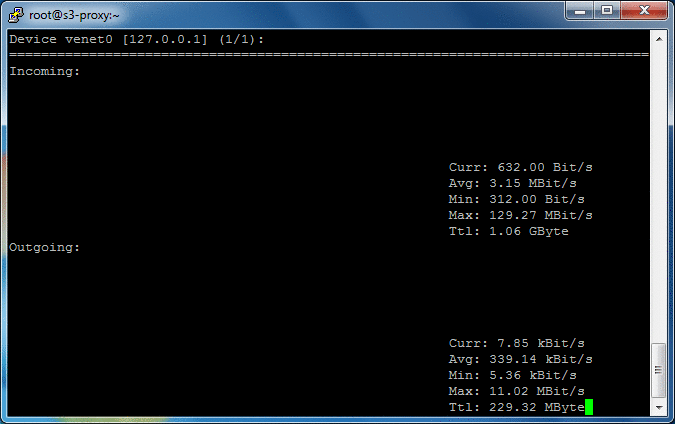
A graph will start building shortly after you enter the commands. This is what it will look like:
If you wish to log the graphing information, increase the interval time and dump it to a file. In the example below, 500 is the interval.
cd ~
mkdir logs
cd logs
nload -t 500 | tee graph.log
Congratulations, you can now use nload on your Vultr VPS. If you no longer need it, nload can be removed by typing:
yum -y remove nload

دیدگاهتان را بنویسید